

From Boosted Posts to a Real Strategy: How I Built a Profitable Meta Ads Funnel
For most of my early days running ads, I’ll be honest — my strategy wasn’t really a strategy at all. Like many small business owners, I was just boosting the posts that performed well on Instagram and hoping for the best.
At first, that worked. But over time, the returns started shrinking. The leads weren’t as consistent, and the ad spend wasn’t stretching as far. That’s when I realized: if I wanted to grow WoCo Studioss I needed to get serious about Meta ads.
This article breaks down exactly how I restructured my ad approach into a clear funnel — and what’s been working best for us today.
Step 1: Build Custom Audiences
The first major shift was moving beyond generic “boosts” into audience targeting. Instead of running ads to everyone, I built custom audiences from people who had already engaged with the brand:
Video Viewers: People who watched 50–75% of my content
Instagram Engagers: People who liked, commented, or visited our profile
Website Visitors: People who visited but didn’t fill out the form
This helped in two ways:
Exclusions — so existing followers wouldn’t see the same ads endlessly.
Lookalikes — Meta could find 1–3 million people with similar behaviors to our best audiences.
Step 2: Structure the Funnel
I broke my ads into three campaigns, each serving a specific role in the marketing funnel:
Cold Acquisition (Top of Funnel)
Broad awareness targeting people who hadn’t seen WoCo before
Split into three ad sets: job title targeting, lookalike form submitters, and lookalike IG engagers
Winner: Job title targeting (brand managers, social media managers, etc.)
Result: $20/day budget generated 4 leads in one week
Lookalike Campaign (Middle Funnel)
Lookalikes of high-intent visitors and video watchers
Meta spent very little on the website visitor audience (not strong enough), but…
Video viewers delivered: 3 conversions at $33 per conversion
Retargeting Campaign (Bottom Funnel)
Narrow focus on people who visited our form multiple times or watched a lot of content without converting
Only produced 1 conversion
Takeaway: Retargeting may need to be broader — instead of over-segmenting, simplify to “all visitors who haven’t converted.”
Step 3: Track and Refine
The key lesson here is that Meta will tell you where to spend. Some of the audiences I thought would perform (lookalikes of form submitters) didn’t. Others (job title targeting) surprised me by outperforming.
Rather than clinging to a single setup, I treat ads like an ongoing experiment: refine, test, and adapt.
What I Learned
Boosting posts works for a while, but it won’t scale. You’re missing out on conversion tracking data and have no control over the audience seeing the ads…
Audience exclusions are just as important as targeting.
Lookalikes can be hit or miss — don’t assume they’ll beat a well-built interest or job title audience.
Retargeting should be simple. If it’s too narrow, you might strangle your own results.

Four-Point Lighting for Product Videography
Lighting can make or break a product shot. At WoCo Studios, we often start our shoots with a simple yet powerful four-point lighting system—labeled A, B, C, and D—that creates clean, dimensional images without overcomplicating the setup. Whether you’re shooting a bottle, compact, or tube, this approach gives you control, consistency, and that polished, editorial feel.
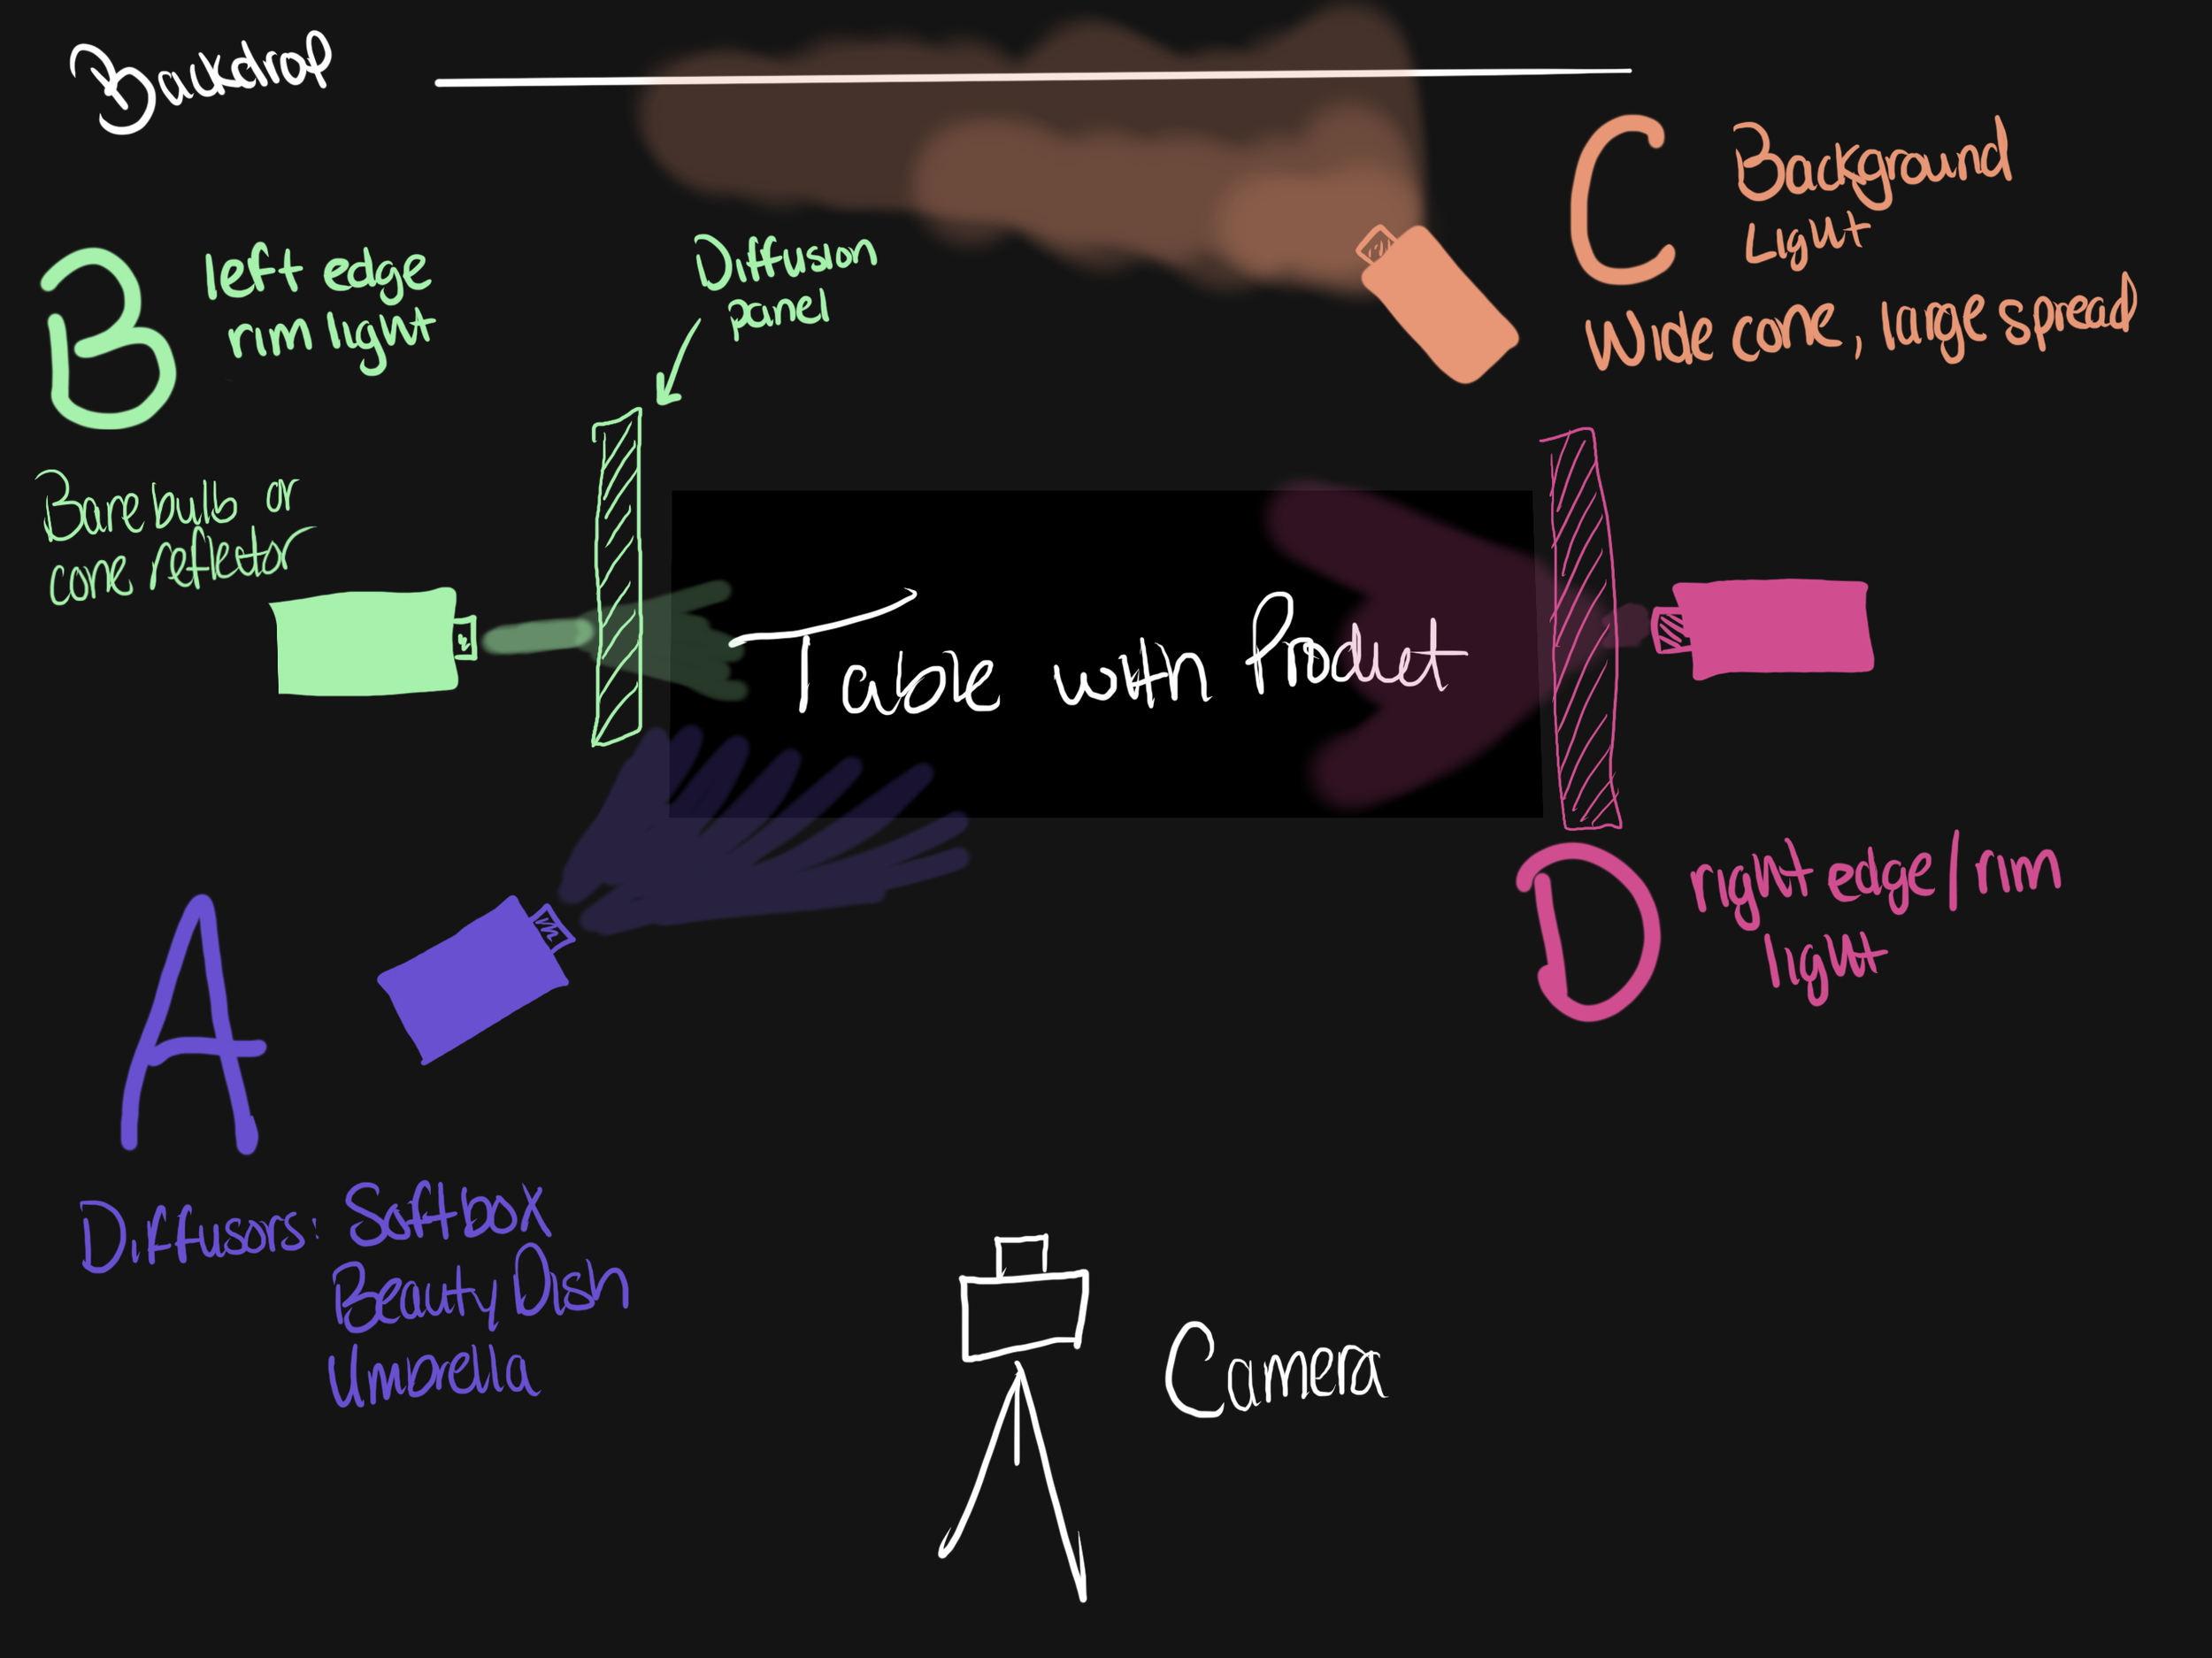
The Setup
A — Key Light (Front Light)
Position: Front-left of the product
Diffusion: Softbox, beauty dish, or umbrella
Purpose: Brings the product to life, showing true color and detail without harsh shadows
B — Left Rim Light
Position: Back-left of the product
Modifier: Bare bulb or cone reflector
Purpose: Adds subtle edge highlights to separate the product from the background
C — Background Light
Position: Aimed at the backdrop
Spread: Wide cone for even coverage
Purpose: Lifts and textures the background so it feels intentional, not flat
D — Right Rim Light
Position: Back-right of the product, through a diffusion panel
Purpose: Complements the left rim light, defining shape and adding depth
How to Build the Look
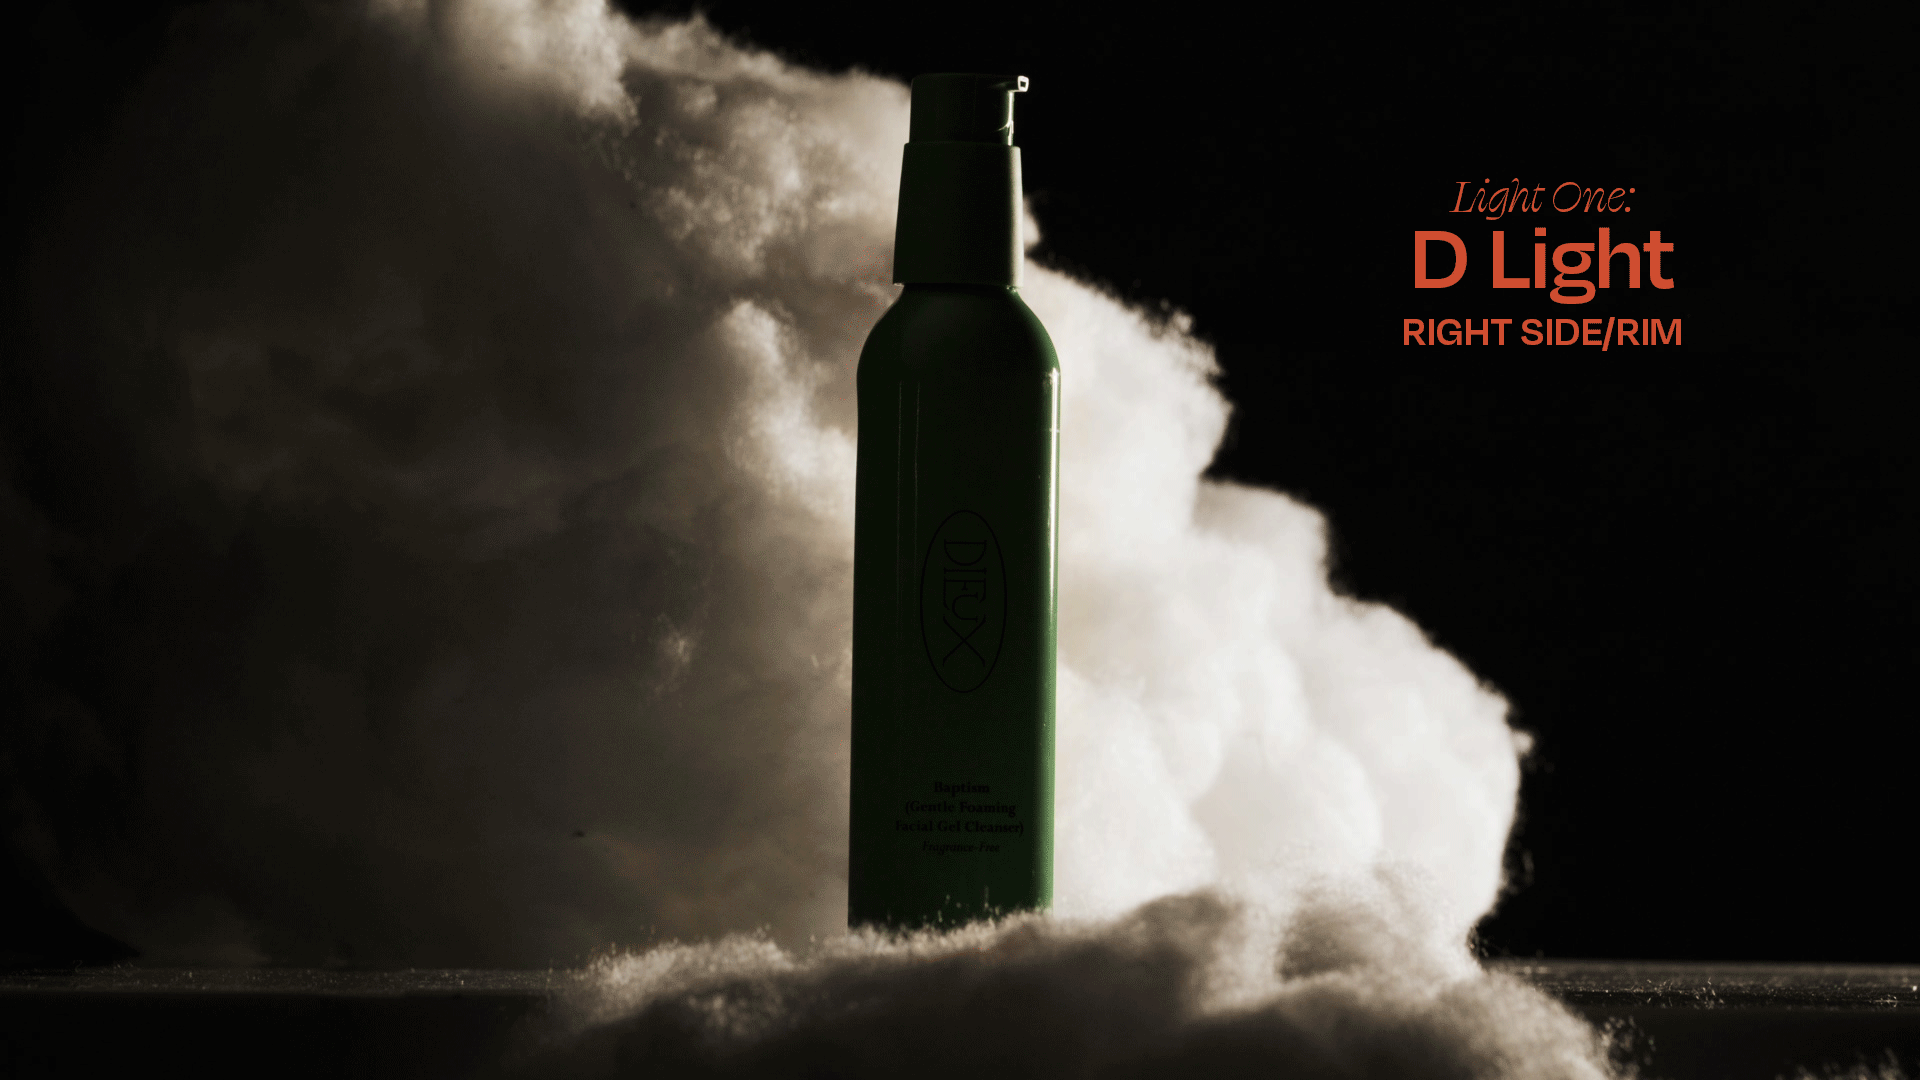
Start with D — Establish a soft backlight on the right edge.
Add B — Balance it out with the left edge light for shape.
Light the backdrop (C) — Add depth and separate the scene.
Finish with A — Fill in the front for clarity and final exposure.